.png)
|
Navigation: Components >
Component Editor |
Send comments on this topic. |
Introduction
The component Editor is the components information centre, the component record. A place where details are stored and drawn from The Component editor is sometimes called the Component Card.
The Component Editor
* Everything marked with an Asterisks is a mandatory field and must be filled in before saving.
Component Code:
This the components Identifier and should always be the same as the supplier code so that when stock ordering they will identify with it.
New
If you have component on screen and want to then clear it to start a new component press the New button at the end of the Component Code Field.
Save As New
A handy feature that allows you to create a component then make a slight change and save it as a new component. Click Here for full details
Description
The description of the component. This is usually the same as the suppliers description but can be changed to enhance the identification of the component. Suppliers often do not have very good descriptions and sometimes you may find a need to adjust there basic description to something clearer.
Please Note: Lets say the supplier has bad descriptions and you decide to make them more descriptive and then next year you re-import the component list update over the top of the old list. We have designed AwardPro Component Import system to not override original descriptions so you can keep your component description tidy up in tacked.
When Creating a Description consider the grouping and identification for searching and sorting requirements.
When using the component in a product bill of materials you can edit the component description to identify it better for the specific product such as:
LZ991 Brushed Silver LaserPly -- could become - LZ991 Brushed Silver LaserPly Side panel
Sell Part Of
Sell Part of means the ability to sell only part of a component like a sheet of engraving material or a length of extrusion.
Please see the comprehensive Sell Part of documentation for full details.
Variation
Variation makes Promotional Products easy. Whenever a "Ticked" Variation component lands on a sales screen a variation note pad appears revealing any preloaded variables for the component such as Shirt colours, USB stick sizes and timber finishes. You do not even have to have choices pre loaded, you can add them at the sales point. Any notes added to components are are displayed on supplier orders so the supplier knows what sizes, colours etch you want for the item.
Please see the comprehensive Component Variation documentation for full details.
Price Information
AwardPro is structured to house as many supplier quantity price breaks as the supplier has. But when you add a component to a bill of material it draws the price directly from the Price to Use for costing Purposes field.
If you add a component directly to a sales order the component will be marked up based on the suppliers Mark Up setting and the quantity break price. See Adding a Component to a sales Order for full details. You may decide to sell things such as Apparel as a component rather than a Product and there for have aset Mark Up (from the Supplier Card) and a cost base for mark up set from the quantity added.
.png)
You will see two currency titles on the Component Editor Screen.
Your Currency: This is the currency AwardPro factors costings and sales in. The base currency.
Suppliers Currency: Each Supplier be assigned a particular currency and that currency is effected by the exchange rate system
This is the cost value that is used by the Product Editor. The value is a sum total of:
The first qty price divided by the Supplier's Currency exchange rate plus the Increase Component Cost percentage factor
This system is designed around traditional Trophy Store Costing where you you the single unit cost to base you mark up from and any purchasing discounts for quantities is used as a profit buffer or gets taken up in discounts given.
Lets look at the above example see the formula at work.
On the right Price Grid you can see that the one off price for the component is .86c
The Supplier is using a local currency so there is no conversion factor
The Increase component Cost By percentage factor is zero so again no effect on the price used for costing purposes.
O.k. Now lets take a look at another example.
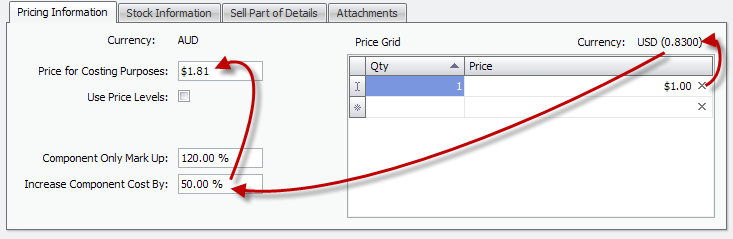
· Here the Price Grid says the component cost is $1.00
· The Supplier trades in US dollars but the Vendor deals un AU dollars. The exchange rate is 0.83c.
· So the $1.00 gets divided by the exchange rate.
· Next the system checks to see if their is a Increase Component Cost by % factor.
· In the case there is a 50% factor so the exchanged cost is increased by 50%.
i.e. $1.00 divided by .83 = $1.2048193 plus 50% = $1.81
Use Price Levels
Feature not yet implemented
Component Only Mark Up
The value initial comes form the Suppliers card setting but can be changed here, for each individual component.
Only related to adding a component to a sales order direct as a Line item. This is the value which is used to Mark Up a component when it is added directly to a sales order.
Component Only Mark Up has nothing to do with Products Bill of Materials system
Some Promotional Products or Apparel can use this system to save the time of creating products out of them.
Example 1
Lets say you have a large range of Pens that have 6 different cost price levels. You may decide that you will sell them at a 120% mark up value. If you add the component directly as a line item on the sales screen the system will establish a cost based on the supplier quantity break and then mark it up by 120%.
Example 2
A customer wants to purchase a blank Foil timber base. You add it to the sales screen as a component and the system will mark it up by the Component only Mark Up of the assigned supplier
This effects the Price for Costing Purposes as explained in the calculations above. This factor can be set up at the suppliers card as a default.
· You can use this when a supplier has an extra cost that adds to the cost of buying the stock such as a hefty freight bill or handling fee.
· You can also use it for when there is some excessive labour involved in the production of a type of component.
· Another reason to add a factored value is when the sales team, Production Manager or Stock Manager have to fiddle around with a component to get it to finished.
· You can use this tool to add a factor for storage. If you buy in bulk and store goods a common business practice in to factor in the holding cost.
The primary reason for this feature is to account for the extra cost involved in components such as when there is an expensive freight bill.
For detail documentation on Increase Component cost by Click Here.
Always based on the actually suppliers currency setting and the current exchange rate setting.
You can add as many rows as you want.
Stock Information
Here is where you have Inventory stock information and manage the amount you buy and when to buy.
In this example you can see that there are decimal placing on the screen below. This allows us to manage "Sell Part Of" and house less than a full amount.
You can only use a less than whole unit if you have made the part a sell part of.
.png)
Decimal Place
If a component has been set as a Sell Part Of component the decimal place fraction becomes available. You will be able to set a less than 1 amount for the SPO component.
You can not set a non Sell Part Of component to less than one whole unit
Current Stock
The amount of stock you have in store and available to be sold to the next customer.
You can adjust it here if required
Re-Order level
Sets a level to re-order. You may want to always have 10 in stock at all times.
Set the value here and every time the stock gets below that level it will automatically re-order
Default amount is 1
You can set an a reorder amount here which will become the minimum amount the system will automatically order.
You can edit this at the supplier order though if you do not want the extra stock
Available Stock Not Yet Received (ASO)
Commonly known as ASO, this shows any stock that is on an outstanding supplier order (pending or ordered but not yet received)
This stock could be part of a re-order amount condition such as the above sheet stock example. The re-order is 5 and there appears to be 1.82 left over that will go into stock once it arrives.
It is stock that is available to be used for new sales orders and it will be used automatically and re-assigned to the new sales order.
We set it as ASO because so it does not get confused as stock on the shelf until it becomes just that.
See also: Available Stock On Order
Sometimes you purchase components for show room display. If it stays blank it could be used at a later stag but for know we want to order it and then set it aside so as to not appear in the Current Stock tally. You can at anytime change the status from Sample Stock to Current stock.
Sample stock gets tallied up and added to the Inventory Value total.
Sell Part Of
You can set up a component to sell only part of it such as engraving and sublimation material, Sand Blasting Resist, Vinyl and other sheets stock that you cut a shape from. Also their are components such as a bag of Nuts, a bottle of glue, Extrusion and things you buy that are sold in a pack that have multiple units within.
For full details of Sell Part Of please refer to the extensive Sell Part of help documents in this Help manual.
Most components pre=installed that are sell part of style components are already set up for you. However there may be some that are not set up and will to be.
.png) Fig. 1
Fig. 1
.png)
Fig. 2
To Set a Component a Sell Part of:
1. Add in all normal information to the Component Card.
2. Determine in the SPO style is a shape or a unit of
3. Select either the Shape or Unit of radio button
4. Enter in the size or Unit of value
Orientation (shape)
In the Case of Shape Styles you can lock in the orientation of a shape SPO by checking the box. This is used for when you want to force the calculation to calculate a specific way
When a material has a lineal grain (brushed finish) it is normally required to be cut so that always the longest length of the cut plate will be the direction of the grain. This is relevant as the system will work out how many pieces can be cut from the sheet in this orientation. Where there is no grain it does not matter so the system will work out as many cut pieces as possible regardless of direction.
Attachments
Each Component can have multiple files attached to it. You could add a picture of the component or you could add a manufacturing instruction. You can add any kind of file to a component card and you can set it to print to job sheets, supplier orders and Quote/Order Confirmations
This is a fantastic facility that allows you to attach a file such as a suppliers manufacturing instruction of a custom base so that when ever you order the base in the future the file will be sent to the supplier with the purchase order making an efficient file management system.
It can also be used for internal manufacturing instructions for complex parts and checked to print with job sheet so that every time the part is used in a job the file prints with the job sheet ensuring proper clear instructions are bundled for the job.
See the Attachments help document for full instruction.
.png)
Is Generic.
Check this box to make the part a Generic Part. This will activate the Generic Parts Replacement System at the Sales Screen.
Generic Components are components that need to be changed when they reach a sales order. Components such as 1" centres will need to be changed for each customer so in the Bill of Materials of a Product you set up a generic component for that centre.(Most suppliers have a generic component code - C88, 1K? for example) Then when the product is added to a Sales Order you are automatically prompted to change the part to what the customer requires.
For full details see Generic Parts Documentation.
Here you can set a component up as a non-ordering component meaning that it will not automatically go to a supplier order when landed in a Sales Order. The component can still be ordered manually.
You might decide to set some adhesives or paints as non ordering so it does not automatically order stock.
Standard engraving stock may also be selected as Non Ordering as you are using so many small bits. You certainly could set is as ordering and add in the size of every plate to get a close estimate of needs but thats a big and fiddly job which may not be totally worth it.
Performance
Link to the components sales analysis.
Make Product.
This is a very handy tool that creates a product form the component. When you have set up a component and saved it you can click the Make Product button and a New Product Editor will open with the component code as the product code, the description of the component as the product description and the component itself in the Products Bill of Materials.
You can use this facility for:
· Resin figures that are primarily 1 component
· standard and custom medals - you create the component then make the product
· Apparel and other promotional items
Last Modified
Non Editable. This is just a marker that lets you know when this component card was last modified. It may be handy to see when the price was last changed
Copyright © <2010> <AwardPro Pty Ltd>